
In the past, I shared a tutorial on how to create a journal entry in SAP. It lets you create any type of postings in SAP. In addition, you can create a GL posting, an asset posting, or sub-ledger postings to a customer or a vendor in tcode F-02. What if you want to create a customer invoice in SAP directly without making use of posting keys. FB70 tcode in SAP lets you create a customer invoice directly.
FB70 is a standard tcode given by SAP to create customer invoices only. It’s not like that you cannot create a customer invoice in F-02, you certainly can do. But sometimes users feel more comfortable using FB70 rather than F-02.
Moreover, you don’t need to select any posting keys for customers or GL accounts in this tcode. You can just input a customer code and the offsetting GL account codes to create customer invoices. Also, the standard SAP Customer Invoice tables used to store FB70 data are BKPF (Header data) and BSEG (Line Item Data).
If New GL Accounting is active, then you can also see the data in table FAGLFLEXA.
Table of Contents
You can enter tcode FB70 in the SAP easy access screen to enter the initial screen of customer invoice or you can also go through the following path:


After that, the main input screen will pop-up. Here, you need to enter the customer and the GL account details. In the ‘Transaction’ field at the top, the Invoice option will be activated by default. But from the same screen, you can also post a customer credit memo by selecting the relevant transaction type.

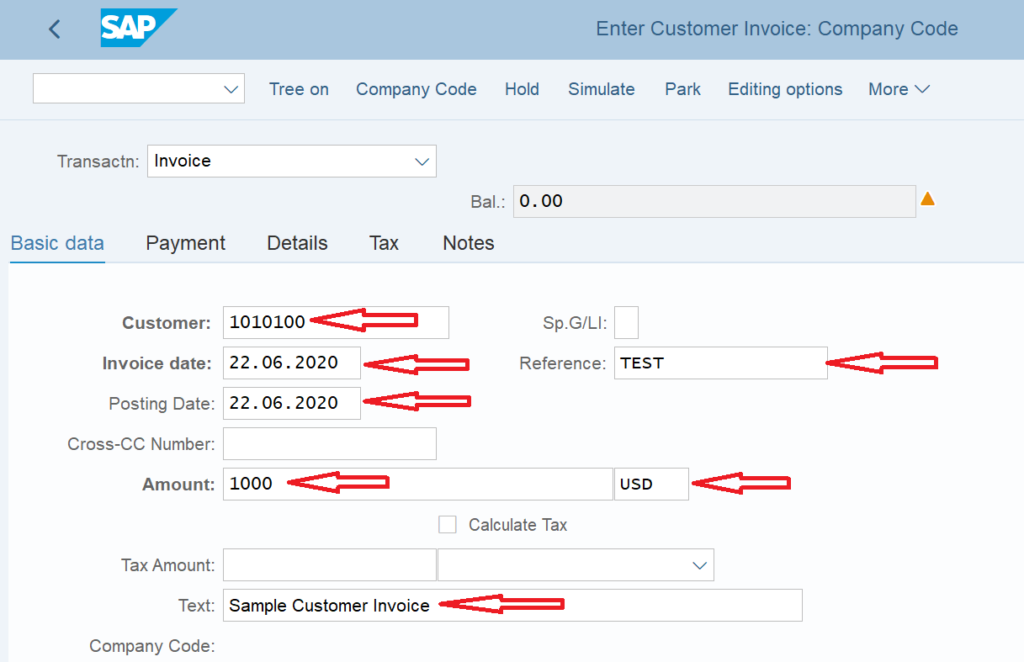
Enter the Customer code for which the customer invoice is to be created. Also, enter the Invoice date (the date on which invoice is created), the posting date (the date on which the posting to sub-ledger account takes place), the invoice amount, and the currency for the customer invoice.
Please note that all these 4 fields are mandatory and should be filled correctly.
Apart from this, you also have an option to fill in the Reference and the Text fields. Both of the fields are optional and can be used to capture the additional details and narration of the invoice respectively.
Moreover, if a customer is eligible to pay an output tax, then you need to specify the tax code or the tax amount separately.
Once you have filled the customer details, the next step is to provide the GL account details. Usually, in any customer invoice, the sale is booked to a revenue account (a Profit & Loss Account).
So, you can provide revenue or a sales GL account to record the sale of a customer invoice.

Enter the revenue GL account and since it is a customer invoice, you have to credit the sales. So, select the Credit option in the D/C input field.
After that, enter the amount for the sales account. You can also fill the Assignment and the Text fields to capture additional data related to this revenue account transaction.

After entering the GL account details, you also need to enter the profit center code in the Profit Center field. As you know that in SAP, all the costs are recorded at the cost center level and all the revenues are recorded at the profit center level.
Since we are posting a transaction to a revenue account, we need to specify the profit center to book the revenues.

After entering all the details, you can see that the Balance Amount is zero and the indicator turns green. In conclusion, this means that the debit and the credit amounts are matching and there is no amount mismatch.
On the other hand, if you see any amount in this field and the red indicator, it means that the amount is not matching and there is a difference of this much amount between debit and credit amounts.

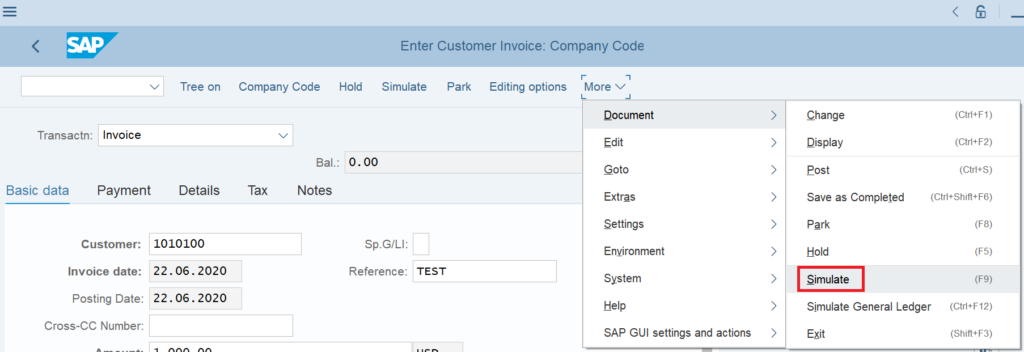
Once all the data has been entered, the next step is to Simulate the posting. A simulation is a process of displaying the final entry before the posting to the customer account or revenue GL account takes place.
Follow the path highlighted in the screenshot above to simulate the document.

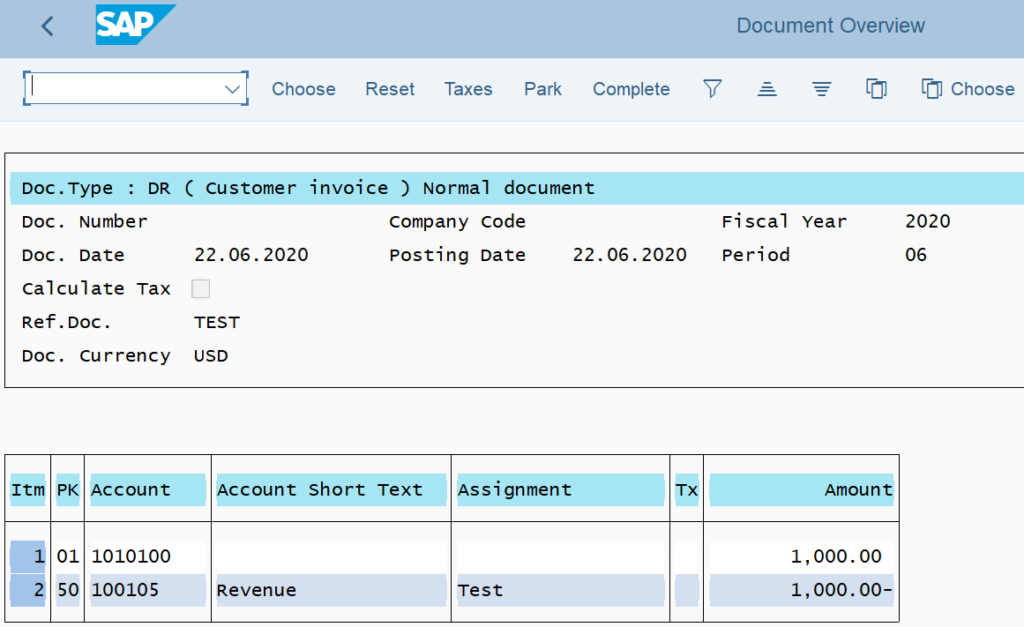
As a result, a simulate option will display the final output of the customer invoice along with its accounting entry. You can cross-check all the details on this screen.
If you see any discrepancy in the data, you can correct it by double-clicking on the line item and then making the changes. In case, all the information is correct, you can post the document by clicking on the ‘Post‘ button or by pressing Ctrl+S on your keyboard.
As a result, the system will generate a customer invoice document number. In conclusion, this document number is the accounting document number and you can display it in SAP in transaction code FB03.
A system generates the following Customer Invoice Accounting Entry in SAP:
Customer Account 1000 Dr.
Revenue GL Account 1000 Cr.
After the creation of a customer invoice, it is important to clear this open item or invoice when a customer makes a payment. This comes under the process of an Incoming Payment in SAP. You can also go through my tutorial on how to create an incoming payment in SAP.
Many organizations also use the Dunning process to send timely reminders to customers for their outstanding amounts. This comes after the creation of a customer invoice and when the invoice has crossed the due date. Usually, organizations don’t send dunning letters to every customer considering credit exposure.
Whenever a customer buys some goods from a firm, the firm in return creates a customer invoice that contains the information of goods. In other words, a customer invoice is a liability that a customer is liable to pay.
You can create a customer invoice in SAP using multiple ways: One being directly in FI using tcode FB70 and the other being in the SD module via sales order.
Once a customer invoice is raised, you can display it using tcode FB03. You need to enter the customer invoice document number in FB03 to display the accounting document. In case, a customer invoice is created in the SD module via sales order, then you can view it in tcode VF03 by entering the billing document.
I hope you liked this article. Please also go through the Foreign Currency Valuation and the FBL3N Report tutorial. Above all, do share this post with others and stay tuned!